Our Location
304 North Cardinal St.
Dorchester Center, MA 02124

304 North Cardinal St.
Dorchester Center, MA 02124

Softaculous Auto Installer
Does your server have Softaculous installed? If so, you may alternatively install Blesta through Softaculous.
Installatron Auto Installer
Does your server have Installatron installed? If so, you may alternatively install Blesta through Installatron.
Bash Script for Almalinux 8/9
We have a beta bash script for installing Blesta on Almalinux 8 or 9 FRESH MINIMAL INSTALL. Must run as root. Do not run on a server with anything else on it. Fresh server only. This is a beta release. Download below.
install-blesta.sh
Watch the video or follow these steps to install Blesta on your server.https://player.vimeo.com/video/287730808
Visit https://account.blesta.com/client/plugin/download_manager/client_main/ and click to download the latest version.
Unzip the Blesta archive (.zip) file using your favorite compression utility. On Windows, right click and select “Extract All”. If the zip is uploaded to or downloaded directly to a Linux server, run the following in your shell:
unzip blesta-vx.x.x.zip |
The Blesta files are available in the /blesta/ directory. These are the files you should use by default. However, it may be necessary to overwrite some of them with a set from a hotfix directory.
The files from a hotfix directory need to be applied if you do not have ionCube but have the Sourceguardian PHP extension instead. The default files support PHP 7.2, 7.3, 7.4, 8.1, 8.2, 8.3 using ionCube. PHP 8.0 is only supported with Sourceguardian and the hotfix.
Apply the hotfix by overwriting the contents of the /blesta/ directory with the contents of the hotfix directory (e.g. /hotfix-php8/).
Upload the contents of the /blesta/ directory to your server where you will be accessing Blesta. Before you continue any further, ensure you’ve created a database that Blesta can be installed into. You’ll need your database host (usually localhost), database name, database user, and database user password to continue with installation.
Blesta may be installed in one of two ways, either via the web in your browser, of via command line.
Follow these steps to install Blesta via the web.
The following is an example PHP script to perform automatic (not interactive) installation via the web URL:
Web Installer CURL Script
<?php## This makes a POST request to the Blesta installer#$post = [ 'agree' => 'yes', 'host' => 'localhost', 'port' => '3306', 'database' => 'blesta', 'user' => 'user', 'password' => 'password',];$ch = curl_init();curl_setopt($ch, CURLOPT_URL, 'myblestadomain.com/install/process');curl_setopt($ch, CURLOPT_POST, true);curl_setopt($ch, CURLOPT_POSTFIELDS, http_build_query($post));curl_setopt($ch, CURLOPT_RETURNTRANSFER, true);$response = curl_exec($ch);$errors = curl_error($ch);curl_close($ch);echo "RESPONSE: ";print_r($response);echo "ERRORS: ";var_dump($errors); |
NOTE! If the web server is not Apache, or is missing mod_rewrite, the curl URL must be pre-pended with index.php, e.g. myblestadomain.com/index.php/install/process
Follow these steps to install Blesta via the command line.
php ./index.php installRoot Web Directory SettingIf Blesta is not installed in the document root on your web server, it is important to note that the “Root Web Directory” setting will be inaccurate unless you install Blesta while your current working directory is set to the document root:Installing from the web server’s document rootcd /to/your/web/server/document/root/php ./path/to/blesta/index.php installphp ./index.php install -dbhost DATABASE_HOST -dbport DATABASE_PORT -dbname DATABASE_NAME -dbuser DATABASE_USER -dbpass DATABASE_PASS -hostname WEBSITE_HOSTNAME -docroot DOCUMENT_ROOT_PATHWith staff user creation (Fully Scripted) v5.10+:php ./index.php install -dbhost DATABASE_HOST -dbport DATABASE_PORT -dbname DATABASE_NAME -dbuser DATABASE_USER -dbpass DATABASE_PASS -hostname WEBSITE_HOSTNAME -docroot DOCUMENT_ROOT_PATH -domain DOMAIN -licensekey LICENSE_KEY -firstname FIRST_NAME -lastname LAST_NAME -email EMAIL -username USERNAME -password PASSWORDParameterDescriptionVersion Added-dbhostThe database hostname (usually localhost)3.0-dbportThe database port (usually 3306)3.0-dbnameThe database name3.0-dbuserThe database user3.0-dbpassThe database password3.0-hostnameThe website hostname. For example, billing.domain.com. The is the hostname where Blesta will be accessed from. If not set, will attempt to detect the hostname from server configuration, which in many cases will not be accurate.3.0-docrootThe full absolute path to the web server’s document root (e.g. /var/www/html/). This should not be set to Blesta’s installed directory unless Blesta is installed in document root. If this value is not set, it will be set based on your current working directory, which will not be accurate unless the current working directory is the document root.This value can be changed from within Blesta, after installation, under Settings > System > General > “Root Web Directory”.4.6-domain(Optional) The domain to be used in template email addresses.This value is used to determine email addresses for templates and can be changed under Settings > Company > Emails.5.10-licensekey(Optional) The license key for Blesta. If none is provided, a trial license will befetched.5.10-firstnameThe First Name of the first Staff user.5.10-lastnameThe Last Name of the first Staff user.5.10-emailThe email address for the first Staff user.5.10-usernameThe username for the first Staff user.5.10-passwordThe password for the first Staff user.5.10Once completed, you’ll be logged in for the first time automatically. For subsequent logins, see Logging In. You may also want to enable Two-Factor Authentication.
License Information
If you do not have a license key, you will be able to activate a free trial during the installation process directly. If you have previously purchased a license key, you will be able to enter it during the installation process. You may obtain a license directly from us at www.blesta.com, from one of our resellers, or directly from your hosting provider. Version 2 license keys are not compatible with version 3, so if you only have a version 2 license key you will need to request a version 3 key for each version 2 license you hold.
Once installation is complete, a cron job must be created to automate tasks within Blesta. Go to [Settings] > [System] > Automation, and copy the “Cron Command”, for use in creating a cron job on your server. Most hosting control panels provide an easy way to create cron jobs, follow the documentation for your control panel to complete this important step. The cron job should run every 5 minutes. Once the cron has been configured, verify that the status icon turns green and displays the last time run on the System Automation page within Blesta.
If using a control panel to configure the cron, you may not need to copy the first part of the cron command “*/5 * * * *” which designates that the cron run every 5 minutes. Your control panel may ask for schedule information separately. Please also note that your path to PHP may be different, as it can vary from server to server. On some cPanel servers, the path is /usr/local/bin/php
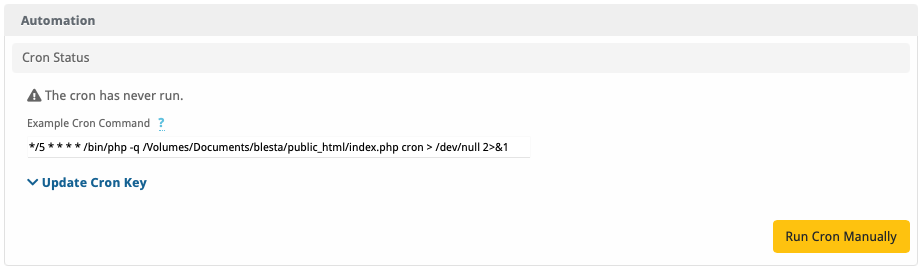
Cron Emails
The cron outputs information about the tasks it is running, and your cron daemon may email your cron user the output of your Blesta crons. To disable that, you can append the following to the end of your cron command: ” >/dev/null 2>&1″ (remove quotes)
Running the cron via the web
Using CLI is always recommended, but the cron may be run by accessing https://www.yourdomain.com/blesta/install/path/cron/?cron_key=CRONKEY where CRONKEY is your cron key as displayed under “Update Cron Key”
wget method
/usr/bin/wget -O /dev/null -q https://www.yourdomain.com/blesta/cron/?cron_key=CRONKEY
If you do not have mod_rewrite, the URL will need to include index.php, for example: https://www.yourdomain.com/blesta/install/path/index.php/cron/?cron_key=CRONKEY where CRONKEY is your cron key as displayed under “Updated Cron Key”.
There are a number of configuration settings that may be set before or after installation.
By default Blesta does not include index.php as part of any URL request, thanks to the use of .htaccess mod_rewrite rules. If your server does not support mod_rewrite Blesta requires index.php to be included in all URLs. To force Blesta to include index.php in all URLs simply rename or delete the .htaccess file included with Blesta in your root web directory.
Does your server support URL rewriting?
If so, you may be able to enable pretty URLs by creating the appropriate web server config, and modifying the /lib/init.php file to set define(“HTACCESS”, true);
By default the path to the Admin area begins with /admin/. To change this locate routes.php in /installpath/config/routes.php and modify the value of the “Route.admin” configuration. For example, to change the path of the admin area to /staff/ set the following:
routes.php
Configure::set("Route.admin", "staff"); |
By default the path to the Client area begins with /client/. To change this locate routes.php in /installpath/config/routes.php and modify the value of the “Route.client” configuration. For example, to change the path of the client area to /customers/ set the following:
routes.php
Configure::set("Route.client", "customers"); |
If your server supports mod_rewrite, you can enable HTTPS redirects by uncommenting the following lines (remove the ‘#’ symbols) from the .htaccess file included with Blesta.
.htaccess
#RewriteCond %{HTTPS} !=on#RewriteRule ^ https://%{HTTP_HOST}%{REQUEST_URI} [R=307,NE,L] |
% mysql% SET SESSION old_passwords=0;% SET PASSWORD FOR 'username'@'localhost' = PASSWORD('password');<?xml version="1.0"?><configuration> <system.webServer> <rewrite> <rules> <rule name="Main Rule" stopProcessing="true"> <match url=".*" /> <conditions logicalGrouping="MatchAll"> <add input="{REQUEST_FILENAME}" matchType="IsFile" negate="true" /> <add input="{REQUEST_FILENAME}" matchType="IsDirectory" negate="true" /> </conditions> <action type="Rewrite" url="index.php" /> </rule> </rules> </rewrite> </system.webServer></configuration>Next, update /core/ServiceProviders/MinphpBridge.php and make the following change:// $htaccess = file_exists($rootWebDir . '.htaccess');$htaccess = true;Experienced users only
Please note Nginx is for experienced or advanced users; for beginners we highly recommend Apache or LiteSpeed (Premium) because nginx can be confusing to set-up correctly.
# Redirect HTTP to HTTPSserver { listen 0.0.0.0:80 default_server; # IPv4 listen [::]:80 default_server; # IPv6 server_name account.yourdomain.com; # Hostname return 301 https://$host$request_uri;}# Run Blesta on SSLserver { listen 0.0.0.0:443 default_server ssl http2; # IPv4 listen [::]:443 default_server ssl http2; # IPv6 server_name account.yourdomain.com; # Hostname root /var/www/account.yourdomain.com; # Installation directory # SSL cert/key pair ssl_certificate /etc/ssl/certs/account.yourdomain.com.crt; ssl_certificate_key /etc/ssl/private/account.yourdomain.com.key; # iFrame protection add_header X-Frame-Options SAMEORIGIN; location / { try_files $uri /index.php; rewrite ^(.*)/install\.php$ /$1/install/ redirect; } location = /index.php { fastcgi_pass unix:/run/php/php7.3-fpm.sock; # PHP socket fastcgi_param SCRIPT_FILENAME $document_root/index.php; # Blesta /index.php fastcgi_param SCRIPT_NAME $fastcgi_script_name; include fastcgi_params; } location ~ /\. { log_not_found off; return 404; } location ~* \.(php|pdt|txt)$ { log_not_found off; return 404; }} Here’s an additional configuration for systems with TLS 1.3 support (Running OpenSSL 1.1.1+)// $htaccess = file_exists($rootWebDir . '.htaccess');$htaccess = true;server.modules += ( "mod_redirect")server.modules += ( "mod_rewrite")#if blesta install is http://<mydomain>.<mytld>/clients/url.rewrite-if-not-file = ( "^/clients/(.*)$" => "/clients/index.php" )url.redirect = ( "^(.*)/clients/install.php$" => "$1/clients/install/" )